That box of family photos in the closet is not getting safer with time. Prints fade, corners curl, albums trap moisture, and one plumbing leak or hurricane season surprise can erase decades of family history. If you are wondering how to digitize printed family photos, the good news is that the process can be simple – as long as you make a few smart choices before you start.
Digitizing old photo prints is not just about making copies. It is about preserving details, faces, dates, and everyday moments that may only exist in one physical form. For many families, these photos are the only record of grandparents, childhood homes, military service, weddings, or holidays that no phone camera ever captured. Done well, digitization helps protect those memories and makes them easier to share with children, siblings, and future generations.
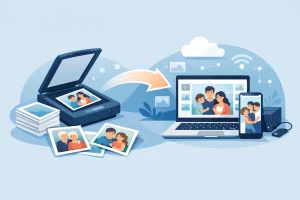
How to digitize printed family photos without damaging them
The first step is handling the originals carefully. Older prints can be more delicate than they look, especially if they have been stored in basements, attics, garages, or magnetic albums. Before scanning anything, wash and dry your hands or use clean cotton gloves for especially fragile photos. Work on a clean, dry surface away from food, drinks, and direct sunlight.
If the photos are dusty, use a soft microfiber cloth or a gentle air blower. Avoid household cleaners, paper towels, and aggressive rubbing. A small scratch or smear may not seem serious in the moment, but once it is scanned, that damage becomes part of the digital file too.
It also helps to sort before you scan. You do not need a museum-level system, but a little organization saves time later. Group photos by family branch, year, event, or person if you can. If dates are unclear, even rough labels like “late 1970s” or “summer vacations” are useful. This is often the point where people realize they have more than just a scanning project. They have a family archive.
Choose the right method for digitizing photo prints
There are two common ways to digitize printed photos: scanning them yourself or using a professional service. Which one makes sense depends on the size of the project, the condition of the photos, and how much time you want to spend.
A flatbed scanner is usually the best at-home option for loose prints. It gives better detail and more even lighting than taking a picture with a phone. If your goal is preserving images for the long term, a scanner is the better choice in most cases. Phone scanning apps can be helpful for quick sharing, but they often introduce glare, perspective distortion, or uneven color, especially with glossy prints.
That said, there are trade-offs. A do-it-yourself setup can work well for a small stack of clean, standard-size photos. It becomes harder when you are dealing with curled prints, delicate albums, torn edges, oversized portraits, or thousands of images. That is where professional photo scanning can save time and reduce risk. Families often start thinking they will do it themselves, then stop after the first 200 photos because the project is more time-consuming than expected.
What scanner settings matter most
Resolution matters, but more is not always better. For most printed family photos, scanning at 600 DPI is a strong choice. It captures enough detail for archiving, reprints, and sharing without creating unnecessarily massive files. For very small prints, damaged photos, or images you may want to enlarge later, 1200 DPI can be worth it.
File format matters too. JPEG files are smaller and easier to share, which makes them practical for everyday use. TIFF files are larger but preserve more image data, making them better for archival purposes or restoration work. Many families benefit from keeping a high-quality master file and then creating smaller copies for email, texting, and digital albums.
Color mode should match the original print. Scan color photos in color, black-and-white photos in grayscale, and avoid automatic enhancements unless you have tested them first. Auto-correction can help sometimes, but it can also flatten shadows, shift skin tones, or remove the natural character of an old print.
Preparing albums, loose prints, and fragile photos
Not every family photo collection is easy to scan. Loose prints are straightforward. Albums are more complicated, especially older “sticky” albums with plastic overlays. Removing photos from those pages can cause tearing or peeling, and forcing them loose is rarely worth the risk.
In cases like that, it may be safer to scan the full album page or have a professional handle it. The same goes for photos that are cracked, water-damaged, stuck together, or already fading. When a print is one of a kind, preservation should come before speed.
If there are notes written on the back, do not ignore them. Those names, places, and dates are often as valuable as the photo itself. Scan the back of the print too, especially if the handwriting identifies someone younger family members may not recognize.
How to organize files so they still make sense years later
A beautifully scanned collection is only useful if you can find what you need. Random file names like IMG_0048 or Scan123 are frustrating now and even worse later. A simple naming system helps protect context.
Use clear file names such as 1984_SmithFamily_Reunion_01 or GrandmaRose_HighSchoolPortrait_1949. If exact years are unknown, estimate with care, like circa_1960s. Create folders by decade, family branch, or event. The best system is the one you will actually keep using.
It is also smart to keep a basic spreadsheet or note file if you have a large archive. You can track names, approximate dates, locations, and any stories connected to the image. This step sounds tedious until someone asks, “Who is that standing next to Uncle Mike?” and you are glad the answer was saved.
Backups matter as much as scanning
One of the biggest mistakes people make is finishing the digitization process and leaving everything on one computer or one external drive. Digital files are safer than a single print, but only if they exist in more than one place.
A good rule is to keep at least three copies: one on your computer, one on an external hard drive, and one in cloud storage. That way, if a device fails, a file gets deleted, or a storm damages your home, your collection is still protected.
This is especially important in Florida, where heat, humidity, and storm risk are part of life. Physical photos are vulnerable enough already. Once digitized, they deserve a backup plan that reflects how valuable they are.
When professional help is the better choice
There is no prize for doing all of it yourself. For many families, the better option is trusting a professional service that handles originals carefully, uses proper equipment, and returns organized digital files without the stress of managing the project alone.
This is often the right move if your collection includes hundreds of prints, album pages, fragile photographs, slides, negatives, or other media you want preserved at the same time. It is also worth considering if family members are counting on you to get it right. The emotional value of the images usually outweighs the temptation to cut corners.
A professional can also help when the goal is more than scanning. Some photos need gentle restoration, color correction, rotation, cropping, or file cleanup to bring faded memories back into view without making them look artificial. That kind of work takes judgment, not just equipment.
For families who want a trusted, hands-on option, HB Media Solutions helps preserve photo collections with professional care and a simple process that keeps the experience clear and manageable from start to finish.
How to digitize printed family photos and still keep the originals safe
Digitizing does not replace the original prints. It protects them by reducing the need to handle them. After scanning, store photos in a cool, dry place in acid-free boxes or sleeves. Avoid basements, attics, and garages where temperature swings and moisture can accelerate damage.
If you want to display a favorite print, consider framing a copy and storing the original safely. Light exposure, especially sunlight, slowly fades old photos even when they are behind glass. The digital version gives you freedom to share and reprint without putting the original at risk.
Some families also create digital folders for each child or branch of the family so everyone can access meaningful images without splitting up the physical collection. That can be a thoughtful way to share history while keeping the originals together and protected.
The real value of this project shows up later. It is the moment a grandchild recognizes a resemblance in an old portrait, or a sibling sees a wedding photo they thought was lost, or a family can tell stories with images on a screen instead of passing around one fading print. Start with one box, one album, or one small stack. Preserving family history does not have to happen all at once, but it is worth beginning now.